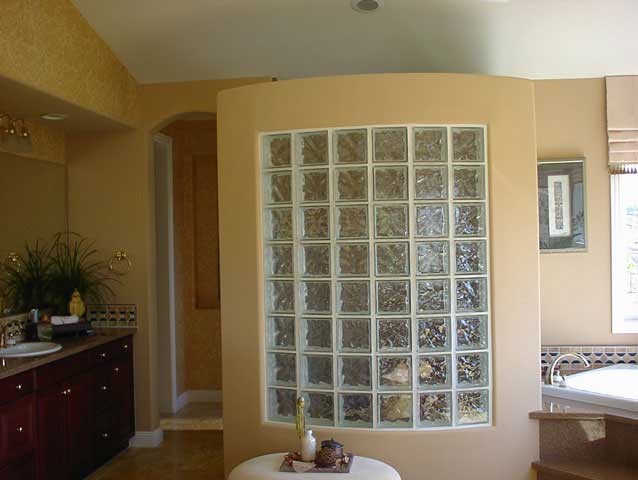
Glass block wall
Glass blocks, or bricks, can be used to create architectural structures such as partition walls or screen walls across part of a room, around a shower or bath, as part of stair constructions and so on. They are capable of dividing a room without blocking light transmission.
Glass block walls are not generally load-bearing, and may need to be strengthened by steel reinforcing rods positioned in the mortar, or by the framing into which they are set. The reason they are not generally load-bearing is that, typically, glass blocks are manufactured hollow, i.e. they are two separate halves which are pressed together and annealed while still molten, leaving a partial vacuum at the centre.
Blocks are produced in various square and rectangular sizes (typically 4 x 8”, 6 x 8” and 8 x 8”), as well as in angled and curved shapes.
Since glass blocks cannot be cut to bespoke sizes, it is important to calculate how the standard sizes fit best into the space required. To roughly calculate the number of blocks required, the length of the wall can be multiplied by its height to find the overall area, before dividing this by the area of one glass block. This calculation does not allow for the mortar joints, and it is recommended to over-purchase in case blocks break during installation.
The first step in laying a glass block wall or screen is to lay out a single row of blocks to work out its general positioning, and the location of any openings (such as doors). If using a timber frame, this should be made to fit the chosen wall dimensions and fixed in place. Expansion foam is then nailed to the inside of the frame, which permits small amounts of movement due to thermal expansion. The foam should be positioned to sit centrally on each length of timber.
Spacers should be positioned inside the floor of the timber frame to hold the glass blocks. Mortar is then applied to the floor of the frame, between the spacers. After spreading mortar on one side of a glass block it is then placed onto the spacers, bedding it into the mortar along the frame. Once the full length of blocks has been laid, mortar is applied along the top.
Reinforcing rods are applied to the horizontal joints (two per row of blocks), by drilling holes in the wall plate. For extra rigidity, rods can be applied to the vertical joints as well. The rods should be pressed down into the mortar before continuing laying blocks on top. After every two courses, a wall tie should be screwed to the wall plate and bedded in mortar.
To avoid wall collapse, no more than six courses of blocks should be built before allowing the mortar to dry overnight. Care should be taken while laying that the blocks are level and plumb.
Once the mortar has dried, the joints can be grouted. If the wall is located somewhere it is likely to come into contact with moisture (e.g. a shower screen), silicone sealant should be applied around the perimeter to make the joints waterproof.
A difficulty that can be faced when building up a glass block wall one-by-one, is that they can ‘swim’ (move slightly) as they are placed. A method that can alleviate this is by installing a prefabricated glass block wall - a wall section pre-made into assemblies. Grooves in the top of the bottom section allow the section above to fit securely.
[edit] Related articles on Designing Buildings Wiki
Featured articles and news
The history of building regulations
A story of belated action in response to crisis.
Moisture, fire safety and emerging trends in living walls
How wet is your wall?
Current policy explained and newly published consultation by the UK and Welsh Governments.
British architecture 1919–39. Book review.
Conservation of listed prefabs in Moseley.
Energy industry calls for urgent reform.
Heritage staff wellbeing at work survey.
A five minute introduction.
50th Golden anniversary ECA Edmundson apprentice award
Showcasing the very best electrotechnical and engineering services for half a century.
Welsh government consults on HRBs and reg changes
Seeking feedback on a new regulatory regime and a broad range of issues.
CIOB Client Guide (2nd edition) March 2025
Free download covering statutory dutyholder roles under the Building Safety Act and much more.
AI and automation in 3D modelling and spatial design
Can almost half of design development tasks be automated?
Minister quizzed, as responsibility transfers to MHCLG and BSR publishes new building control guidance.
UK environmental regulations reform 2025
Amid wider new approaches to ensure regulators and regulation support growth.
The maintenance challenge of tenements.
BSRIA Statutory Compliance Inspection Checklist
BG80/2025 now significantly updated to include requirements related to important changes in legislation.


Comments